EZGUI : La Librairie GUI pour Pixi.js et Phaser.io
Aujourd’hui, nous sommes heureux de vous présenter EZGUI ,
une bibliothèque GUI pour simplifier la création d’interfaces utilisateur pour PIXI.js et Phaser.io développeurs de jeux .
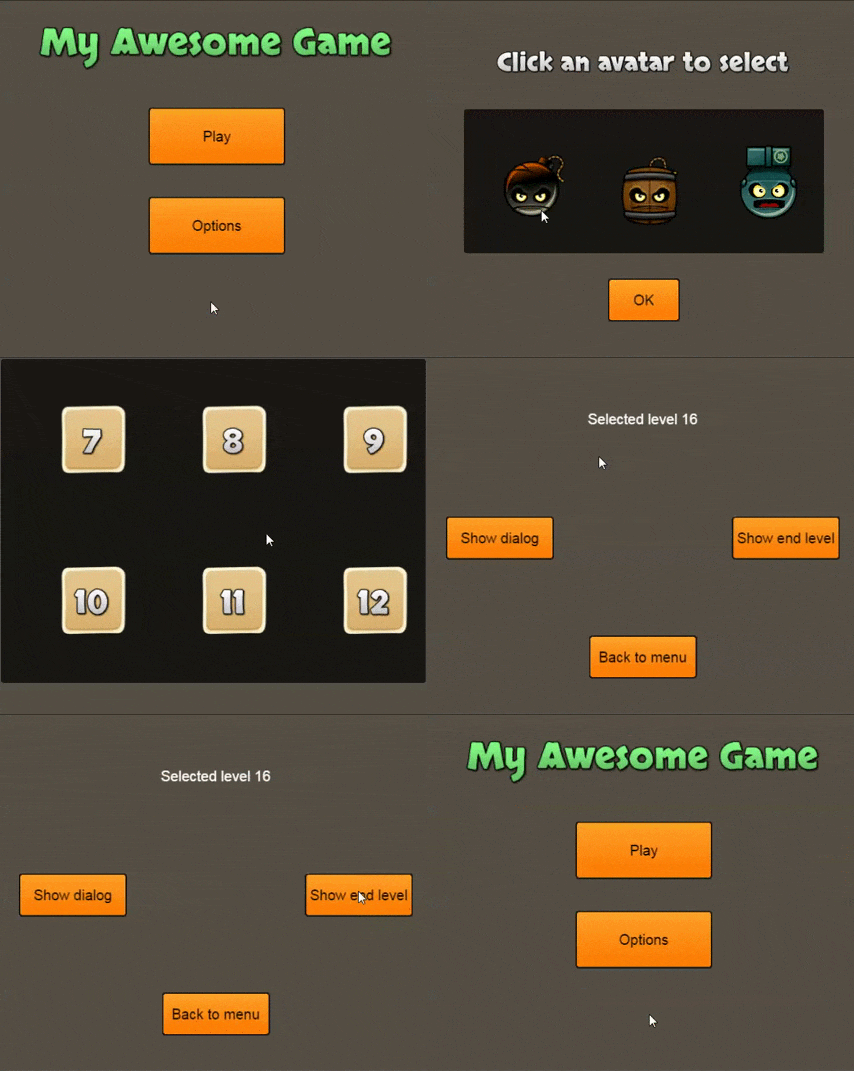
Voici deux exemples de ce que permet EZGUI 🙂
l’objectif principal de EZGUI est de séparer le code de l’UI.
Tous les éléments thèmes/gui sont décrits au format JSON ,ils peuvent ainsi être stockées dans des fichiers séparés afin de garder le code propre .
Le seul code que vous aurez besoin d’écrire consiste à lier votre UI au comportements souhaités à travers les événements. et si vous le souhaitez, vous pouvez ajouter quelques animations et transitions grâce à une API simplifiée (un wrap de TweenJS)
La librairie embarque deux thèmes qui seront améliorés dans les futures versions, ces thèmes utilisent des éléments graphique du pack UI de Kenney et du theme metalworks de la librairie feathers.
Le chargement des composants GUI est assez simple
Le code suivant précharge le theme metalworks, puis crée un élément gui défini dans l’objet JSON mainScreenJSON.
|
1 2 3 4 5 6 7 8 9 10 |
// EZGUI.Theme.load(['../../assets/metalworks-theme/metalworks-theme.json'], function () { var mainScreen = EZGUI.create(mainScreenJSON, 'metalworks'); //bellow line is only needed if we are using Pixi. //for phaser the gui element is implicitely added to the rendering queue stage.addChild(mainScreen); }); |
en supposant que le contenu de mainScreenJSON est :
|
1 2 3 4 5 6 7 8 9 10 11 12 13 14 15 16 17 18 19 20 21 22 23 24 |
// var mainScreenJSON = { id: 'myWindow', component: 'Window', header: { position: { x: 0, y: 0 }, height: 40, text: 'Header' }, draggable: true, position: { x: 0, y: 0 }, width: 500, height: 500, layout: [1, 3], children: [ null, { id: 'button1', component: 'Button', position: 'center', text: 'my Button', width: 200, height: 80 } ] } |
ceci va créer une fenêtre draggable avec un bandeau-titre, la fenêtre contien un bouton enfant placé au centre.
le bouton est centré car nous avons defini un layout d’un élément horizontal per 3 éléments verticaaux, le premier enfant du layout est nul, le second (donc centre vertical) c’est notre boutton, et nous lui avons défini une position ‘center’ qui le met au centre de la cellule du layout.
Une fois les éléments GUI créés avec le JSON ci-dessus, EZGUI nous donne accès aux différents éléments avec leurs IDs respectifs comme suit :
|
1 2 3 4 5 6 7 8 9 10 11 12 13 14 15 16 17 18 19 20 21 |
// //on peut accéder à la fenêtre principale via EZGUI.components.myWindow //on peut accéder au bouton avec EZGUI.components.button1 //et pour attacher un événement 'click' au bouton on utilise : EZGUI.components.button1.on('click', function(event, me) { //event represent the original Pixi or Phaser event //me represent the element receiving the event (here the button) }); EZGUI.components.button1.on('mousedown', function(event, me) { //... }); EZGUI.components.button1.on('mouseup', function(event, me) { //... }); |
Prenons un cas d’utilisation réél
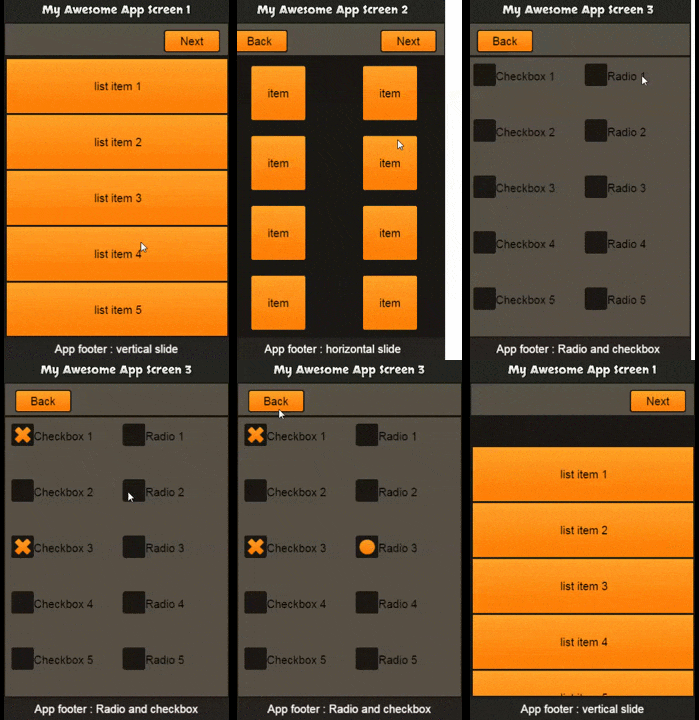
l’interface ci-dessous est interactive
Le code source pour réaliser cet exemple avec Pixi et Phaser est le suivant
Toutes les définitions JSON des élements GUI utilisés sont dans ce fichier
Tout d’abord nous avons besoin d’initialiser la librairie utilisée (Pixi ou Phaser)
|
1 2 3 4 5 6 7 8 9 10 11 12 13 14 15 16 17 18 19 20 21 22 23 24 25 26 27 28 29 30 31 32 |
// // common variables var gameWidth = 400; var gameHeight = 640; //if you use phaser -------------------------------------------------- var game = new Phaser.Game(gameWidth, gameHeight, Phaser.AUTO, '', { preload: preload, create: create }); function preload() { //... your preload } function create() { //... your create } //if you use pixi -------------------------------------------------- var renderer = PIXI.autoDetectRenderer(appWidth, appHeight); renderer.backgroundColor = 0xffffff var stage = new PIXI.Container(); document.body.appendChild(renderer.view); requestAnimationFrame(animate); function animate() { requestAnimationFrame(animate); renderer.render(stage); } |
Maintenant que notre librairie est initialisée nous allont créer les éléments GUI
|
1 2 3 4 5 6 7 8 9 10 11 12 13 14 15 16 17 18 19 20 21 22 23 24 |
// var mainScreen; var secondScreen; var thirdScreen; EZGUI.Theme.load(['../../assets/metalworks-theme/metalworks-theme.json'], function () { mainScreen = EZGUI.create(mainScreenJSON, 'metalworks'); secondScreen = EZGUI.create(secondScreenJSON, 'metalworks'); secondScreen.visible = false; thirdScreen = EZGUI.create(thirdScreenJSON, 'metalworks'); thirdScreen.visible = false; // only add screens to stage if you are using Pixi // remove the bellow three lines if you use phaser stage.addChild(mainScreen); stage.addChild(secondScreen); stage.addChild(thirdScreen); //this function will define the GUI behaviours setupGUI(); }); |
à ce stade , nous pouvons déjà voir l’écran principal , mais en cliquant sur les boutons rien ne se passe.
nous allons coder le comportement du GUI
|
1 2 3 4 5 6 7 8 9 10 11 12 13 14 15 16 17 18 19 20 21 22 23 24 25 26 27 28 29 30 31 32 33 34 35 36 37 38 39 40 41 42 43 44 45 46 47 48 49 50 51 52 53 54 55 56 57 58 59 60 61 62 63 64 |
// function setupGUI() { EZGUI.components.btNext1.on('click', function () { secondScreen.position.x = gameWidth; secondScreen.visible = true; mainScreen.animatePosTo(-gameWidth, mainScreen.position.y, 800, EZGUI.Easing.Back.Out, function () { mainScreen.visible = false; }); secondScreen.animatePosTo(0, secondScreen.position.y, 800, EZGUI.Easing.Back.Out, function () { }); }); EZGUI.components.btPrev2.on('click', function () { mainScreen.position.x = -gameWidth; mainScreen.visible = true; secondScreen.animatePosTo(gameWidth, secondScreen.position.y, 800, EZGUI.Easing.Back.Out, function () { secondScreen.visible = false; }); mainScreen.animatePosTo(0, mainScreen.position.y, 800, EZGUI.Easing.Back.Out, function () { }); }); EZGUI.components.btNext2.on('click', function () { thirdScreen.position.x = gameWidth; thirdScreen.visible = true; secondScreen.animatePosTo(-gameWidth, secondScreen.position.y, 800, EZGUI.Easing.Back.Out, function () { secondScreen.visible = false; }); thirdScreen.animatePosTo(0, thirdScreen.position.y, 800, EZGUI.Easing.Back.Out, function () { //dlg1.visible = false; }); }); EZGUI.components.btPrev3.on('click', function () { secondScreen.position.x = -gameWidth; secondScreen.visible = true; thirdScreen.animatePosTo(gameWidth, thirdScreen.position.y, 800, EZGUI.Easing.Back.Out, function () { thirdScreen.visible = false; }); secondScreen.animatePosTo(0, secondScreen.position.y, 800, EZGUI.Easing.Back.Out, function () { }); }); } |
comme vous pouvez le voir, tout ce que nous avons ici est de définir les interactions et les transitions .
vous pouvez utiliser cette partie du code pour définir le comportement et / ou des interactions spécifiques à votre jeu .
Le plus important étant de maintenir le code spécifique au jeu complètement séparé de l’interface utilisateur.
ainsi vous porrez copier/coller votre GUI d’un jeu à l’autre, elle gardera le même comportement.
c’est le principe de fonctionnement d’EZGUI mais ce n’est pas tout !
puisque la librairie cible principalement les dévelopeurs de jeux, nous prévoyons mettre en place des composant GUI spécifiques pour les jeux, tel que : des écrans de sélection de niveau, des écrans de scores, connexion avec réseau sociaux …etc
Vous pouvez dès à présent forket la version actuelle d’EZGUI sur github https://github.com/Ezelia/EZGUI
ou visitez le site officiel de la librairie : http://ezgui.ezelia.com/
Vos suggestions et contributions sont les bienvenues.
et si vous rencontrez des bugs, n’hésitez pas à les remonter sur le trackeur de bugs de github.


